Natural Face Lift Massage

For best results and flow of energy, I always start by setting an intention (relaxing, clear your skin, youthful flow, healing) for the area of the body that I work on for myself or others. It is important to ensure you drink plenty of water with any type of massage, especially a lymphatic drainage massage. Relax and enjoy this incredible routine.
The Routine:
Step 1: Cleanse
Step 2: Moisturize
Step 3: Neck and Lymph

DIY Hydrating Face Oil
Ingredients:
3 TBS jojoba oil
2 TB rosehip seed oil
1/4 tsp Vitamin E
3 drops carrot seed essential oil or tamanu oil
5 drops geranium essential oil
2 oz. dark dropper bottle
Directions:
- Pour the jojoba oil into dropper bottle. Then add the rosehip seed oil and vitamin E.
- Carefully add your drops of carrot and geranium oil.
- Cap the bottle and give it a good shake. You are all set to go.
You will be doing an upward direction from the throat to the chin and then chin to ears on both sides. Then you will move into a downward direction on the sides of the neck from the ears to the shoulders. You will repeat this upward and downward motion several times. This is the direction of lymph flow and drainage for this area, which stimulates your lymphatic system.
Step 4: Chin and Face
Start the circulation going in an upward direction. Start from the middle of the chin on each side. Using your fingertips, glide upwards toward each ear into the hairline. This will help drain fluid and sculpt the area around your chin. Using wide circular strokes, massage along the sides of your jaw, past the corners of your mouth, next to your nostrils, and over your cheekbones, creating upward lifting. Next, massage large circles upwards into the cheek area to lift and get the circulation going. Continue each area upward and in a circular motion from the center of the face into the hairline and from bottom to top of the cheekbone. Relax and breathe deeply and slowly as you massage your skin.
Step 5: Mouth
Take your index fingers and thumbs and grab your lips. Stretch and knead, nice and slow. Make sure to go a little outside the mouth muscle (orbicularis oris) toward the frown lines (buccinator). Go back and forth 10 times. Massaging this muscle around the mouth prevents fine lines around the lips, known as laugh lines, and will also help plump the lips. It is optional to continue with small circles around the mouth.

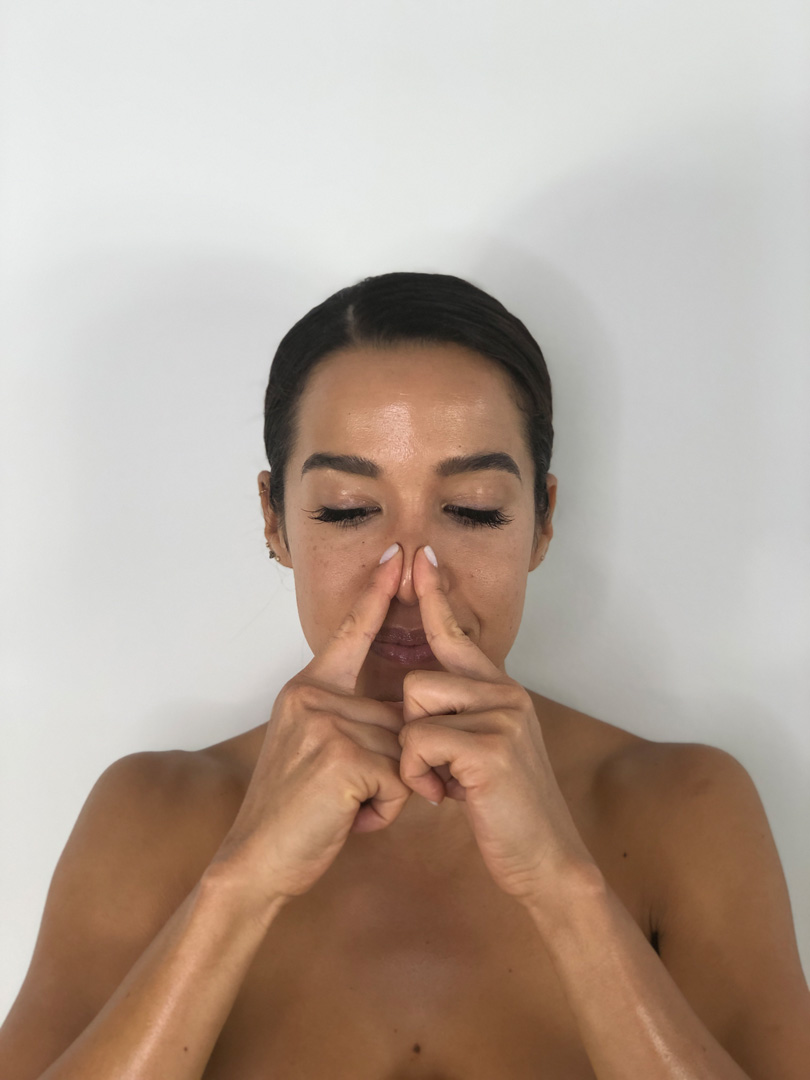
Step 6: Nose
Now I use my fingers and push and drain firmly all the way up the midline to the top of the brow and hold. It’s almost like a little lift, and it also drains underneath the eyes to reduce puffiness. I continue in this area for a minute and really like to use my fingers to sculpt and drain around the nose area. For me, extra fluid builds up here, and it also helps with congestion. Gently pinch the area at the top of your nose. Slide your fingers down to your nostrils. Repeat this motion for one minute, which is great for contouring the nose.
Step 7: Eyes
Here I recommend adding your favorite eye cream. Position your fingers at the arch of your brows. Sweep them around the outside corners of your eyes, gently move them under your eyes, and end with your fingers at the inside corners of your eyes. Continue along up the sides of your nose and along your brow lines. Use your fingertips to slide along the bottom arch of the brows. Hold for a few seconds in each area to help lift and sculpt the brow and the top of the muscle around your eye (orbicularis oculi). This eye massage feels so good and also helps you look more awake and opens your eyes!

Self care. Love yourself. Do a monthly massage to yourself. Do it weekly even. I try to massage all my products in as a lymphatic massage. Enjoy! Use Code: THANKS50 for 50% off!! Get the whole set!!
Invest in your skin. It's going to represent you for a long time
Invest in your skin. It's going to represent you for a long time
~Tiffany💗
Product mention:


Comments
Post a Comment